

Very recently, the Flutter devtool got extended to include a screen that integrates with provider to allow you to inspect and edit the state of your applications.
Let's explain how you can do the same yourself.
Getting started: Setting up the project #
First, let us setup everything. Interestingly, the Flutter devtool is itself implemented using Flutter. So our new screen will be but another Widget. No need to learn a new technology to get started.
It is worth noting that, at the moment, the devtool does not have a plugin mechanism (but there is a design document for it). That means that we will have to contribute directly to the devtool repository. So rather than a new project, we will start by forking the devtool:
- Head to the devtool repository: https://github.com/flutter/devtools
- Click on the fork button:

- Clone the created project:
- Run
flutter pub getin the different packages.
The project structure #
The devtool is a fairly big project. But for writing new screens, we only care about two things:
- packages/devtools_app This is the source code of the Flutter application that powers the devtool.
- packages/devtool_testing This package is where we will write some of our integration tests. More about that later.
Starting the project in debug mode #
The devtool is pre-setup with everything necessary to debug the application using VS Code.
To start the devtool, press F5, and the IDE will start devtools_app, at which point you should see:
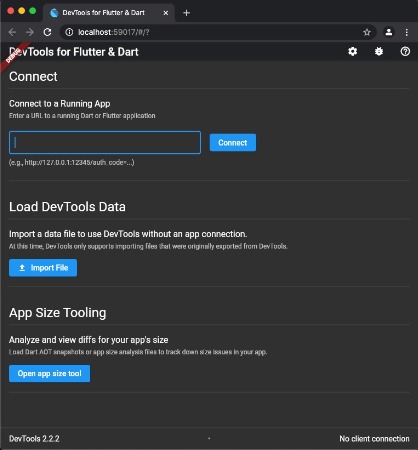
At this stage, the devtool asks us to connect it to a Flutter application.
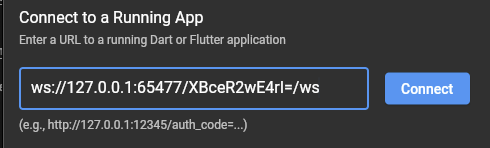
To do so, start any other Flutter project separately. When starting the project, Flutter should output something similar to:
We will need to copy and paste that ws://127.0.0.1:12345/whatever=/ws in the devtool page:
Click connect and you should now see:
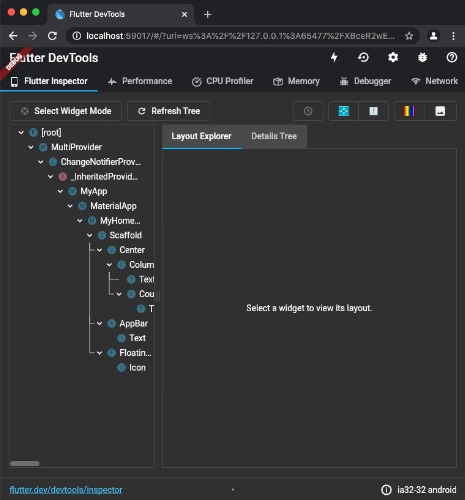
Nice job! We can now start writing our plugin.
Adding a new screen #
Let's add a new screen.
To create a screen, we first need to define a subclass of Screen.
Often, we will want a screen that is visible only if a specific package in the
inspected application exists.
In this case, our Screen subclass will look like:
From there, we need to insert our screen in the list of screens.
For that, head to the file packages/devtools_app/src/app.dart.
You should see a variable named defaultScreens which contains the list of all screens.
Simply add our new class in the list like so:
Hot-restart the devtool, and you should now see your new screen in the list of screens. At this stage, you should be able to write the UI code for your plugin as you would usually do in Flutter.
Interacting with the inspected application #
Adding a new screen to the devtool is great, but this isn't very useful if we cannot interact with the debugged application.
Fortunately, using the package vm_service, it is possible for our new screen to both read and edit variables from the inspected application.
The devtool comes with vm_service pre-installed and setup for us. That is concretized by:
- The global variable
serviceManager, fromdevtools_app/src/globals.dart. It contains numerous information useful to connect with the inspected application. - The class
EvalOnDartLibrary, fromdevtools_app/src/eval_on_dart_library.dart. This class allows us to execute dart code dynamically.
Example: Reading a global variable from the inspected application. #
Assume that the inspected application defined a global variable like so:
We can then use EvalOnDartLibrary to read this variable like so:
Note: You are not limited to inspecting variables. Any valid dart expression is accepted:
You aren't limited to receiving strings either. InstanceRef exposes numerous
properties for reading more complex objects
Defining a "Binding" in the package we interact with. #
As you may have noticed, using EvalOnDartLibrary requires knowing the dart file
we want to inspect.
If you are interacting with a package (like trying to inspect the state of providers), one solution to this is to add debug utilities in the package that the application imports.
For example, provider defines an internal ProviderBinding class that
contains a list of all the providers created by the inspected application:
This allows us to use EvalOnDartLibrary like so:
Evaluating expressions from other variables #
A common use-case for evaluations is to try and evaluate something from a variable obtained by a previous evaluation. For example, we may first get a variable in our application. And then we would like to mutate a property of that variable.
To do so, we can reuse a previously obtained InstanceRef, combined with the
scope parameter of evaluations:
Avoiding expression results from being garbage collected #
By default, results of evaluation queries are not kept in memory.
That can be problematic sometimes, as it can make further evaluations fail because
we are trying to manipulate an object that is no longer in memory.
Sadly vm_service doesn't include a way to preserve objects in memory by default.
Fortunately, Flutter comes with some utilities that allow us to work around the issue: WidgetInspectorService.
Assuming that we first perform an evaluation that creates a variable we want to keep in memory:
We can use WidgetInspectorService by making a separate evaluation to tell Flutter
to keep this variable in memory:
Then, when we later want to re-access our variable, we can do:
And finally, when we no longer need the variable, we can allow it to be garbage collected with:
Receiving events from the inspected application #
In some cases, you may want your devtool to react to events from the inspected application. For example, the Provider devtool wants to listen to when providers are added/removed/updated, so that the devtool can refresh to show the changes.
For this, the inspected application can use dart:developer's postEvent
to emit events that the devtool can then listen to.
In the case of Provider, it uses this function inside the initState of a provider to do:
Then the devtool plugin subscribes to this event with:
Supporting hot-restart on the inspected application #
One thing to keep in mind is that the inspected application may be hot-restarted at any time. The devtool need to handle those cases to avoid situations where the UI shows outdated content.
One way to support hot-restarts is to listen to changes on the inspected isolate:
Inspected application change #
It is possible that the inspected application will change over time, without the devtool being restarted.
In this case, serviceManager.service will be replaced with a new instance.
But this means that the devtool needs to recompute everything that depended on
serviceManager.service, including re-creating instances of EvalOnDartLibrary.
You can listen to changes of serviceManager.service with:
Aborting pending evaluations when no longer needed #
For performance reasons, we may want to cancel pending evaluations.
That can be done using the isAlive parameter that was mentioned in the
previous snippets, combined with the Disposable class.
First, we need to create an instance of that Disposable class:
Then, when making evaluations, we can pass this variable:
Then, if we want to cancel the expression, we can do:
That will automatically abort all pending requests associated with this isAlive variable.
Writing e2e tests #
Last but not least, we will want to write tests.
Since the devtool is implemented using Flutter, you can write unit and widget
tests as usual.
But unit/widget tests will not be able to test anything that uses serviceManager,
since there is no inspected application during tests.
Writing tests for logic that interact with the inspected application could be tricky as we need to interact with both the devtool, and the inspected application at the same time. Luckily, the devtool comes with everything you need for this.
That is where devtool_testing becomes useful.
This package defines testing applications, later used by integration tests.
You can open packages/devtools_testing/fixtures to see the list of built-in
testing applications and potentially add your own there.
For our example, our tests will use the provider_app, an application that uses provider.
Now let's add an e2e test. Adding an e2e test is a two-step process.
We first need to declare a Dart file in packages/devtools_testing/my_test.dart.
This file should export a function (not a main) that defines our tests:
Then, we need to tell devtools_app to run this test.
For this, we need to add a dart file in packages/devtools_app/my_test.dart:
We can then execute our test with:
Note: You will not need an emulator for this to work
That's it!
Our test is then able to interact with vm_service/EvalOnDartLibrary.
We can then update our runMyTests function to test the full flow:
Conclusion #
That's it! You should have all the keys in your hand to be able to extend the Flutter devtool.
Thanks for reading~
And while you're here, I would like to give a shout out to the Flutter team and especially Jacob. The journey of implementing the Provider devtool would have been a lot harder if not for their help.
If you are facing issues too, I am sure they would be glad to help.
Have fun!